
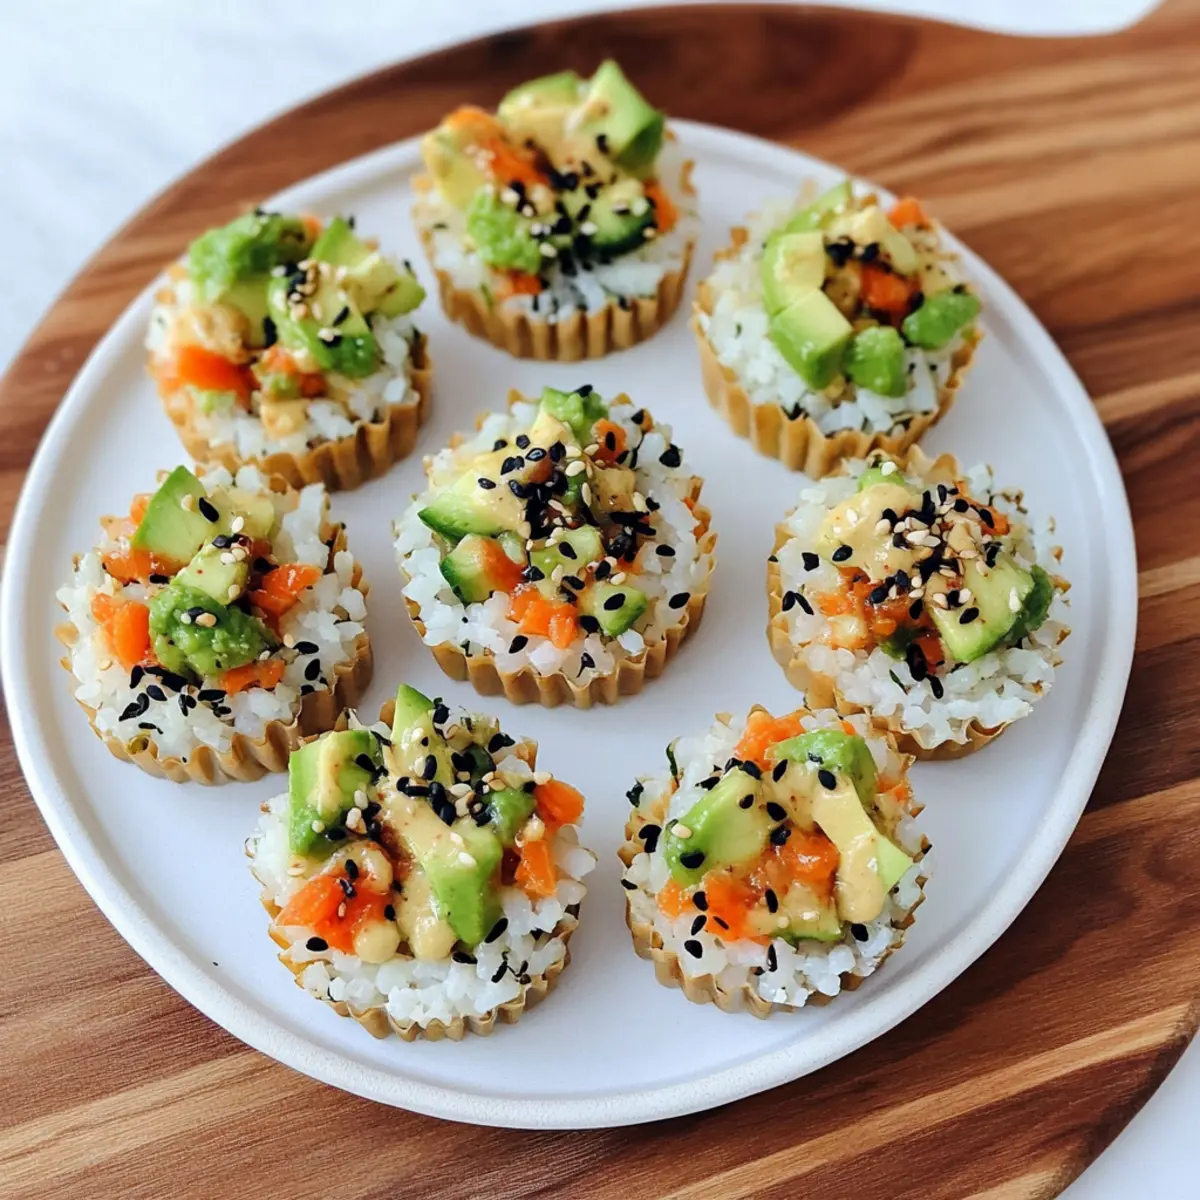
When I first tried my hand at creating sushi cups, I never imagined they would become a favorite in my kitchen. These no-bake Sushi Cups are not only visually stunning but also incredibly versatile, allowing me to mix and match ingredients to suit any taste. Whether I’m whipping them up for a casual lunch or spicing up my next gathering, these customizable delights are my secret weapon to please a crowd without spending hours in the kitchen. Packed with fresh veggies, creamy avocado, and a zesty spicy mayo, they’re a delicious, vegetarian-friendly option that will satisfy your sushi cravings without the fuss. Curious how to make these vibrant bites? Let’s dive into the recipe!
Why Are Sushi Cups So Popular?
Customizable: These sushi cups let you unleash your creativity! Mix and match your favorite veggies, proteins, and sauces to create a dish that reflects your unique tastes.
No Bake: Perfect for busy days, these delightful cups require zero baking, making them a breeze to whip up in no time.
Fresh and Flavorful: Crisp vegetables paired with creamy avocado deliver a burst of freshness in every bite, while the spicy mayo adds just the right kick.
Great for Any Occasion: From casual lunches to elegant gatherings, sushi cups are sure to impress your guests and keep everyone coming back for more.
Healthy Snack Option: With approximately 110 calories per cup, these sushi delights are a guilt-free choice that won’t weigh you down. If you’re looking for more ways to boost your meals, consider experimenting with different filling combinations or dipping sauces, such as ginger dressing.
Sushi Cups Ingredients
For the Rice Cups
• Sushi Rice – Provides the perfect base; rinse thoroughly to eliminate excess starch.
• Water – Essential for cooking the rice to a tender texture.
For the Filling
• Chopped Veggies (1/2 cup) – Adds freshness; think carrots, cucumber, and bell peppers for a colorful crunch.
• Steamed Mukimame (1/4 cup) – A protein-packed addition; you can also substitute shelled edamame.
• Diced Avocado (1/4 cup) – Offers creaminess; use perfectly ripe avocados for the best flavor.
• Sauce of Choice (1 tbsp) – Dress it up with soy sauce or coconut aminos to elevate the taste.
For the Spicy Mayo
• Mayonnaise (1/4 cup) – Acts as the creamy base; Greek yogurt can lighten it up if desired.
• Sriracha (1 tsp, adjust to taste) – Adds a spicy kick; feel free to use a milder sauce for less heat.
• Coconut Aminos or Soy Sauce (1 tsp) – Enhances flavor; omit for a soy-free alternative.
• Honey (1 tsp) – Adds a touch of sweetness; agave syrup is a great vegan option.
• Sesame Oil (1/2 tsp) – Provides an aromatic depth to the mayo mix.
For Garnishing
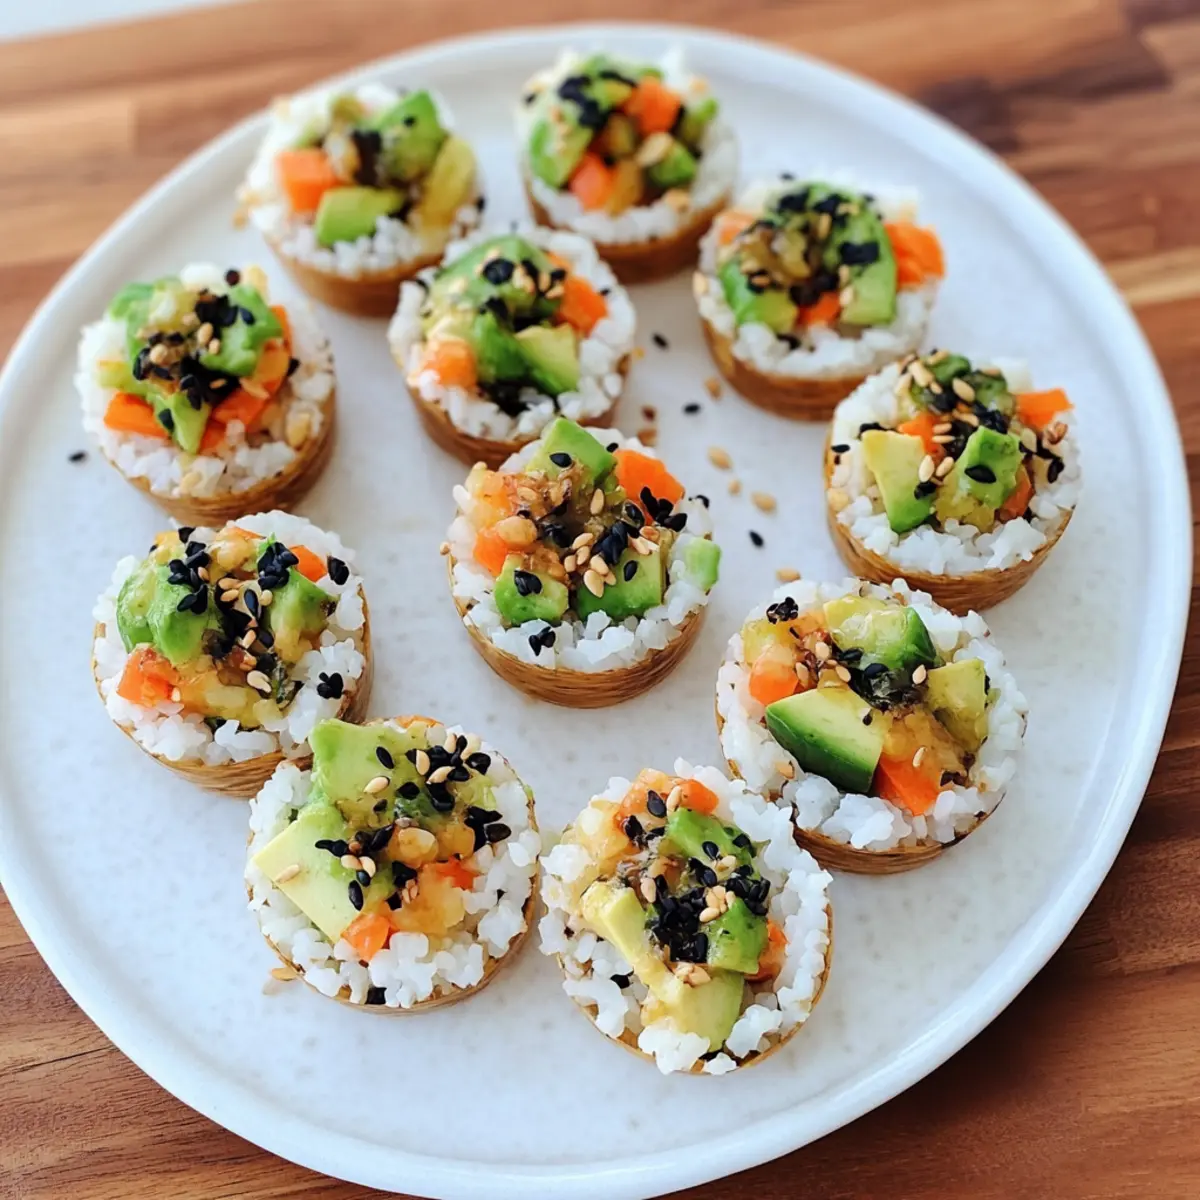
• Black Sesame Seeds – Sprinkle for a beautiful finish and a subtle crunch.
These delightful sushi cups are not only a feast for the eyes but also a fun way to enjoy sushi ingredients in a new format!
Step‑by‑Step Instructions for Sushi Cups
Step 1: Cook the Rice
In a medium pot, combine 1 cup of rinsed sushi rice with 1 ¼ cups of water. Bring the mixture to a rolling boil over medium heat, then reduce the heat to low, cover, and simmer for 20 minutes. Check that the rice is tender and has absorbed all the water. Remove from heat and let it cool slightly before handling.
Step 2: Shape the Rice Cups
Once the sushi rice has cooled enough to handle, take two heaping tablespoons of rice and press it firmly into each slot of a silicone muffin pan. Ensure the rice is compacted and shaped well to form a sturdy cup. Place the muffin pan in the refrigerator for 20 minutes to help the rice cups set firmly.
Step 3: Prepare the Filling
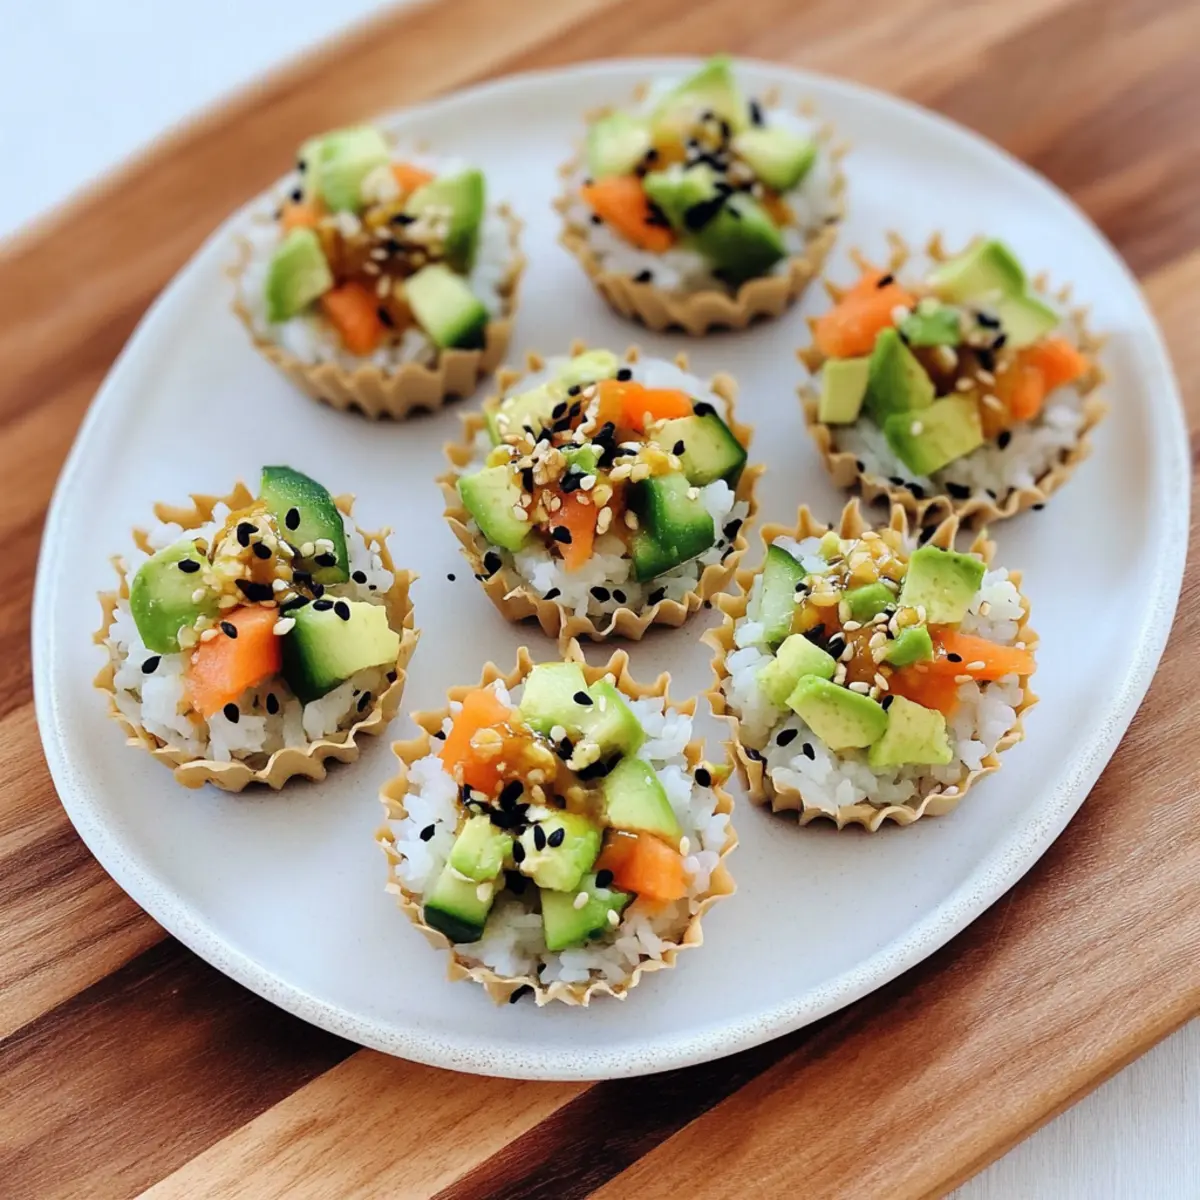
In a mixing bowl, combine ½ cup of your chopped veggies, including carrots and cucumbers, along with ¼ cup of steamed mukimame and ¼ cup of diced avocado. Drizzle with your choice of sauce, such as soy sauce, and gently mix until the veggies are nicely coated. Set aside to allow the flavors to meld together while the rice cups chill.
Step 4: Make the Spicy Mayo
In a medium bowl, whisk together ¼ cup mayonnaise, 1 teaspoon of Sriracha, 1 teaspoon of coconut aminos or soy sauce, 1 teaspoon of honey, and ½ teaspoon of sesame oil. Blend well until smooth and creamy, adjusting the Sriracha to your preferred spice level. This zesty sauce will enhance the flavor of your sushi cups beautifully.
Step 5: Assemble the Cups
Once the rice cups are set, remove the muffin pan from the refrigerator. Carefully pull out each rice cup and place them on a serving platter. Spoon a generous helping of the veggie filling into each rice cup. Drizzle the prepared spicy mayo over the filling and finish with a sprinkle of black sesame seeds for a delightful presentation.
Expert Tips for Sushi Cups
-
Rinse Rice Well: Rinsing the sushi rice thoroughly is crucial to prevent stickiness. A well-rinsed rice yields the ideal texture for your cups.
-
Compact Cups: When shaping your rice cups, ensure you press the rice firmly into the silicone molds. This helps them hold their shape, making assembly easier.
-
Chill Before Filling: Refrigerate the rice cups for 20 minutes after shaping. This sets the rice cups, giving them the desired firmness for filling.
-
Keep Veggies Crunchy: Choose fresh, crisp vegetables for your filling. Avoid overcooked options to maintain texture and prevent sogginess in your sushi cups.
-
Customize Sauces: Feel free to adjust the spice level of your mayo according to your taste. Experimenting with sauces can elevate your sushi cups to new flavor heights!
-
Diverse Protein Options: For added protein, consider incorporating shrimp, crab, or additional edamame, making the sushi cups even more satisfying and delectable.
Make Ahead Options
These customizable sushi cups are perfect for meal prep enthusiasts looking to save time! You can prepare the rice cups and the spicy mayo up to 24 hours in advance. Simply boil the sushi rice, shape it into cups, and refrigerate in an airtight container to keep them fresh. The filling can also be prepped a day prior; mix vegetables, mukimame, and your sauce in a bowl, then store in the fridge. For the best quality, assemble the cups just before serving to ensure the rice stays firm and veggies remain crisp. With this method, you’ll have delicious sushi cups ready to go with minimal effort!
Sushi Cups: Flavorful Customization Awaits
Feel free to play with the ingredients in your sushi cups to create a unique taste experience that truly excites your palate.
- Protein Boost: Add shrimp or crab for a seafood twist. Cooked proteins elevate the flavor while enhancing the nutritional value.
- Quinoa Base: Swap out sushi rice for quinoa for a nutty flavor and added protein. This option gives you a delightful texture while keeping it gluten-free.
- Creamy Alternatives: Use Greek yogurt instead of mayonnaise for a tangy, lighter sauce. This simple swap offers a protein-packed twist!
- Varied Veggies: Experiment with other crispy vegetables like radishes, snap peas, or bell peppers for a colorful crunch. Freshness is key!
- Spice Levels: Replace Sriracha with chili garlic sauce if you’re craving more heat. This garlic-infused option!
- Gluten-Free Options: Choose tamari or coconut aminos as gluten-free alternatives for added flavor in your sauces.
- Herb Infusion: Fresh cilantro or basil added to your veggie mix enhances the flavor profile and introduces an aromatic dimension.
- Garnish Variations: Instead of black sesame seeds, try chopped green onions or crushed peanuts for a distinctive finish with crunchiness.
With these variations, your sushi cups will never be boring! For even more delicious ideas, don’t forget to try them with delectable dipping sauces like ginger dressing. You won’t want to miss the opportunity to explore endless combinations!
Storage Tips for Sushi Cups
- Room Temperature: Sushi cups are best enjoyed fresh, but you can leave them out for up to 2 hours before refrigeration. Beyond that, they should be stored to maintain freshness.
- Fridge: Store sushi cups in an airtight container in the fridge for up to 2 days. This helps keep the rice firm and the fillings fresh.
- Freezer: If you want to prepare sushi cups ahead of time, freeze them individually wrapped for up to 1 month. Thaw them in the fridge overnight before enjoying.
- Reheating: It’s best to serve sushi cups cold. If you prefer them warm, gently microwave each cup for a few seconds, but avoid overheating to preserve texture.
What to Serve with Customizable No-Bake Sushi Cups
Elevate your sushi experience by pairing these colorful bites with complementary dishes and refreshing drinks.
- Soy Dipping Sauce: A classic that brings out the umami flavors in sushi, making each bite even more satisfying.
- Chilled Edamame: Lightly salted and packed with protein, they add a crunchy contrast and make a fantastic snack alongside your sushi cups.
- Cucumber Salad: This refreshing salad dressed in rice vinegar enhances the flavors of your sushi and offers a crisp, tangy contrast.
- Miso Soup: Warm and savory, miso soup complements the fresh taste of sushi cups, creating a comforting dining experience. It’s a traditional pairing that delights the senses.
- Ginger Dressing: Bright and zesty, this dressing can be drizzled atop your cups or used as an extra dip, enhancing the sushi’s flavors with a punch of zing.
- Sparkling Water with Lime: A light and refreshing drink that cleanses the palate, letting the flavors of your sushi cups shine.
- Fruit Platter: Serve a colorful mix of seasonal fruits to add a sweet and vibrant finish to your meal, rounding out the flavors beautifully.
- Sesame Noodles: These flavorful noodles with a hint of soy sauce can provide a heartier side dish that mesmerizes with each bite.
- Mochi Ice Cream: For dessert, this sweet treat offers a delightful texture that contrasts with the savory sushi, leaving you with a satisfying end to your meal.
- Green Tea: A warm cup of green tea not only pairs perfectly with sushi but also brings a calming finish to your vibrant dining experience.
Customizable Sushi Cups Recipe FAQs
What is the best way to select ripe avocados for my sushi cups?
When choosing avocados, look for ones that yield slightly to gentle pressure without feeling mushy. Dark green skin is often a good indicator of ripeness. If they have large dark spots or indentations, they might be overripe. Aim for ripe avocados to ensure a creamy texture in your sushi cups!
How should I store leftover sushi cups for freshness?
Store any leftover sushi cups in an airtight container in the refrigerator for up to 2 days. This helps retain the firmness of the rice cups and the crispness of the veggies. It’s best to eat them fresh, but if you store them properly, they can still be delightful!
Can I freeze sushi cups for later use?
Absolutely! To freeze your sushi cups, arrange them on a baking sheet and freeze them individually for about an hour. Once they’re firm, transfer them to an airtight container or freezer bag. They can be stored for up to 1 month. To enjoy, simply thaw them overnight in the fridge or let them sit at room temperature for a while before serving.
What should I do if my sushi rice is too sticky?
If your sushi rice turns out too sticky, try rinsing the rice more thoroughly before cooking. Use cold water to remove excess starch, which can cause that sticky texture. Additionally, once cooked, let the rice cool slightly before packing it into your cups to help firm it up. A good tip is to sprinkle a little sesame oil on your hands while shaping the rice cups to prevent sticking!
Is it safe for my pet to consume ingredients from my sushi cups?
While some ingredients like cucumbers and avocado are safe in moderation for pets, be cautious. Avoid giving them anything like soy sauce or spicy mayo as these can be harmful. Always consult with your veterinarian if unsure about adding new foods to your pet’s diet.
Can I make the sushi cups vegetarian-friendly?
Absolutely! The sushi cups are already a vegetarian option due to their reliance on fresh veggies, rice, and avocado. You can further enhance the protein content by using additional steamed mukimame or substituting any meat ingredients with plant-based options, making them a perfect fit for your vegetarian friends and family!

Customizable Sushi Cups: No-Bake Delights You’ll Love!
Ingredients
Equipment
Method
- In a medium pot, combine 1 cup of rinsed sushi rice with 1 ¼ cups of water. Bring to a boil, reduce heat, cover, and simmer for 20 minutes. Remove from heat and let cool slightly.
- Take two heaping tablespoons of the cooled rice and press firmly into each slot of a silicone muffin pan. Compact well and refrigerate for 20 minutes to set.
- In a mixing bowl, combine ½ cup of chopped veggies, ¼ cup steamed mukimame, and ¼ cup diced avocado. Drizzle with sauce, mix gently, and set aside.
- In another bowl, whisk together ¼ cup mayonnaise, 1 teaspoon Sriracha, 1 teaspoon coconut aminos or soy sauce, 1 teaspoon honey, and ½ teaspoon sesame oil until creamy. Adjust spice level as desired.
- Once rice cups are set, remove them from the muffin pan and place on a serving platter. Fill each with the veggie mixture, drizzle with spicy mayo, and garnish with black sesame seeds.
Leave a Reply