
As I flipped through my favorite brunch recipes last weekend, a little spark of inspiration struck me. Why shouldn’t breakfast be both whimsical and delightful? Enter the Red Velvet Marble Waffles. This dish harmoniously blends two classic batters into a fluffy breakfast delight that’s vibrant enough to brighten any morning. These waffles not only look stunning with their marbled appearance, but they also balance sweet and light flavors, making them a hit for festivities or cozy weekend brunches. Plus, they’re a breeze to whip up, ensuring you can spend less time in the kitchen and more time savoring those delicious bites. Ready to add a splash of color to your breakfast routine? Let’s jump into this delightful recipe!

Why are Red Velvet Marble Waffles a Must-Try?
Festive Fun: These Red Velvet Marble Waffles are a showstopper at breakfast, bringing a joyful burst of color and whimsy to your table.
Fluffy Texture: Each bite offers a delightful balance of fluffy classic waffles and rich red velvet, ensuring everyone leaves satisfied.
Easy to Make: This recipe combines two batters effortlessly, making it a simple yet impressive dish for home chefs.
Less Sweet: With thoughtful sweetness, they are perfect for those who prefer a lighter touch in their breakfast treats.
Crowd-Pleasing: Whether for special occasions or a cozy family brunch, these waffles are bound to impress and bring smiles around the table.
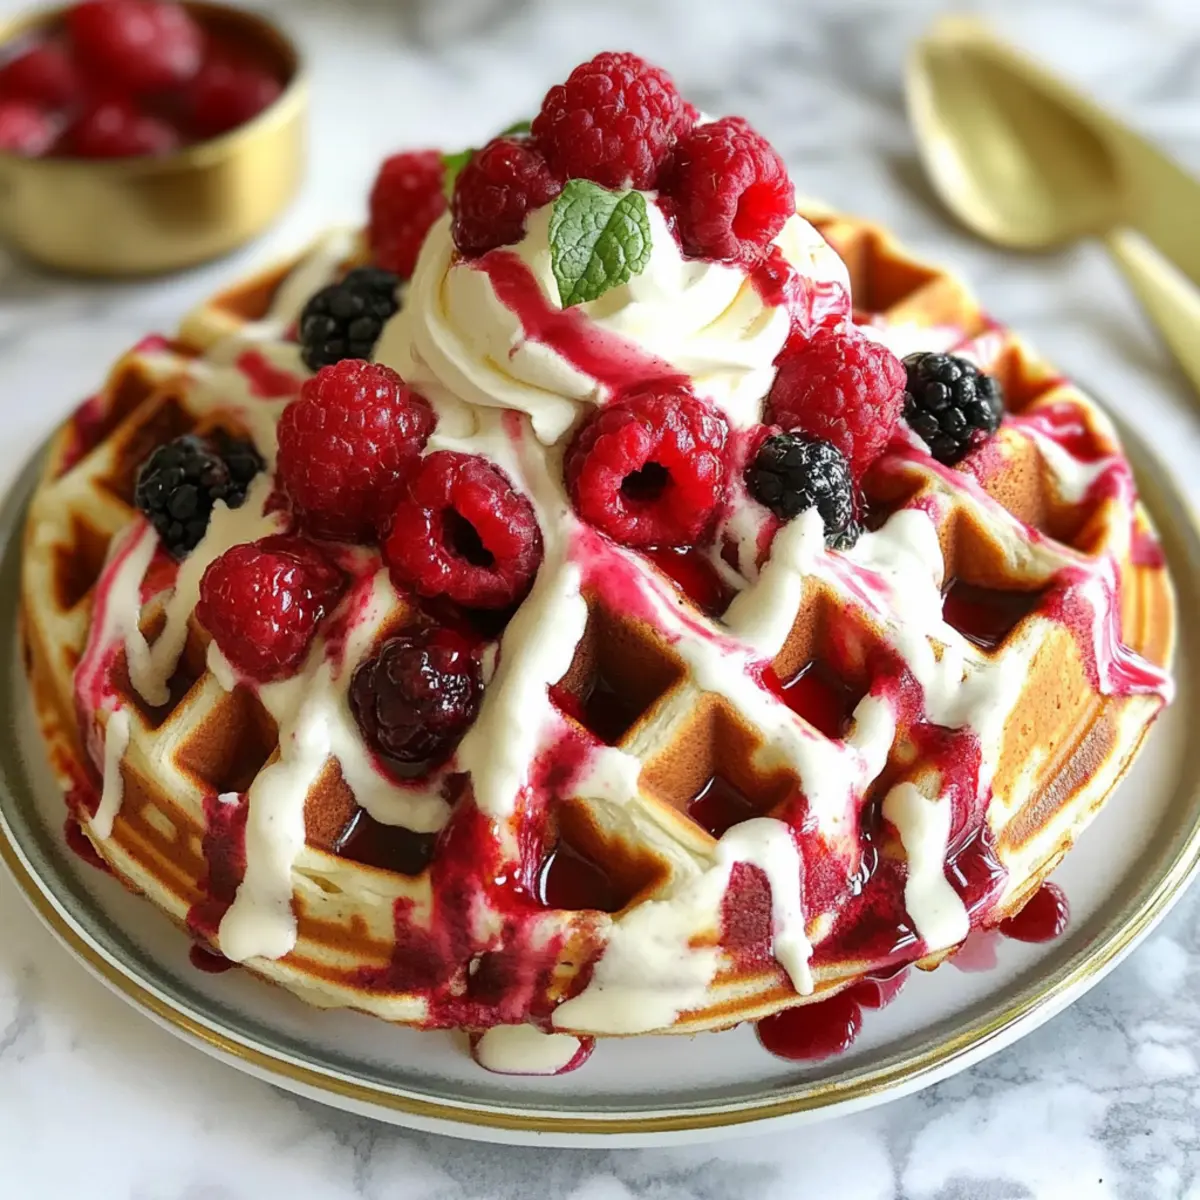
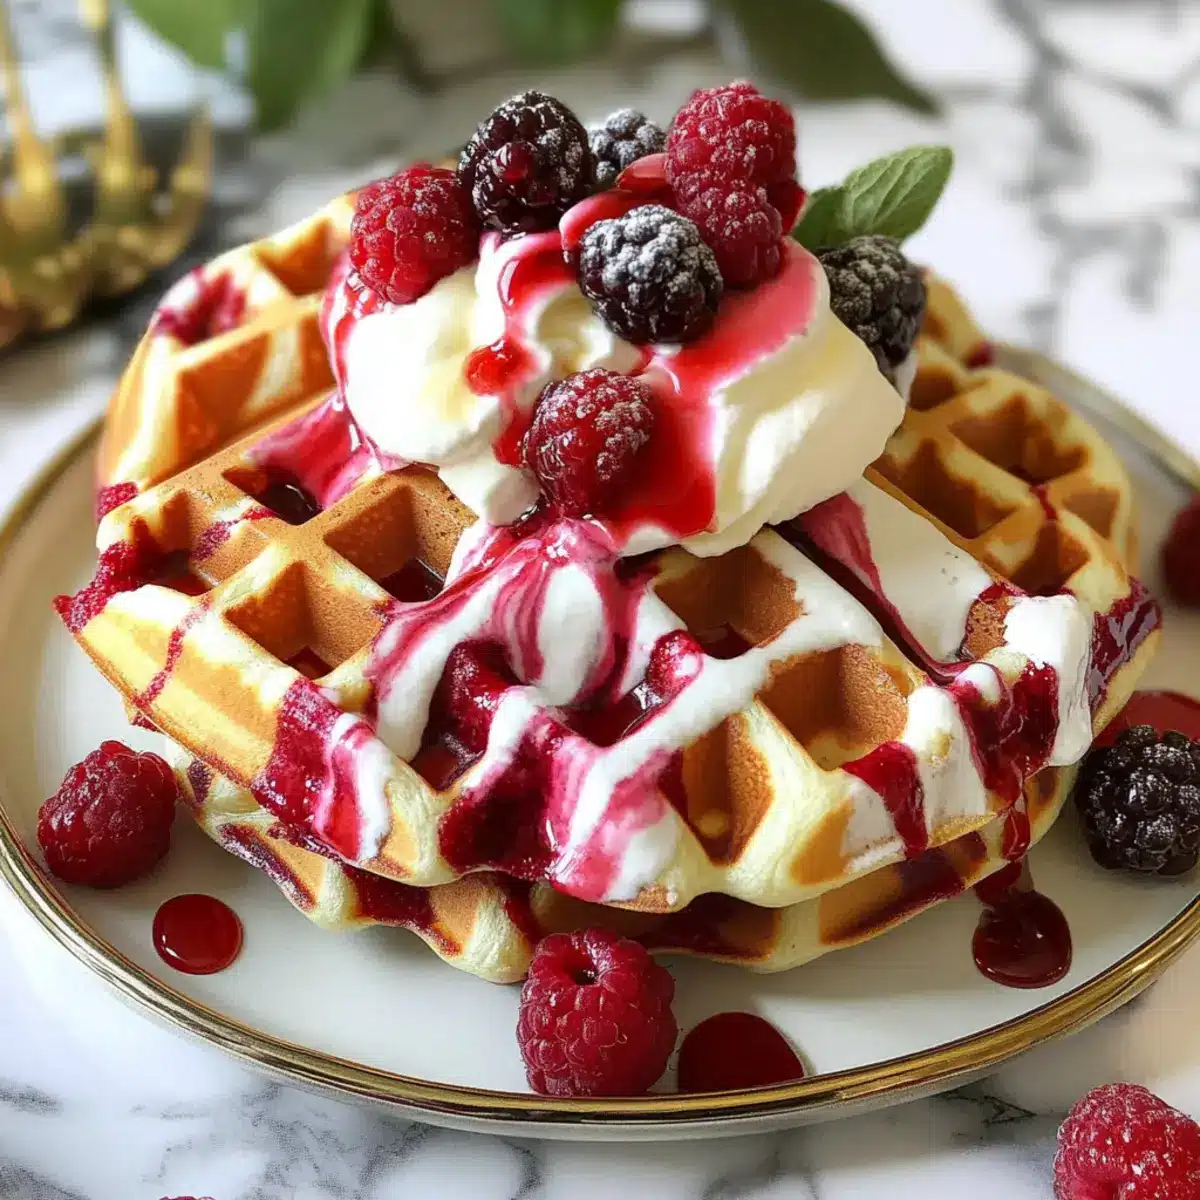
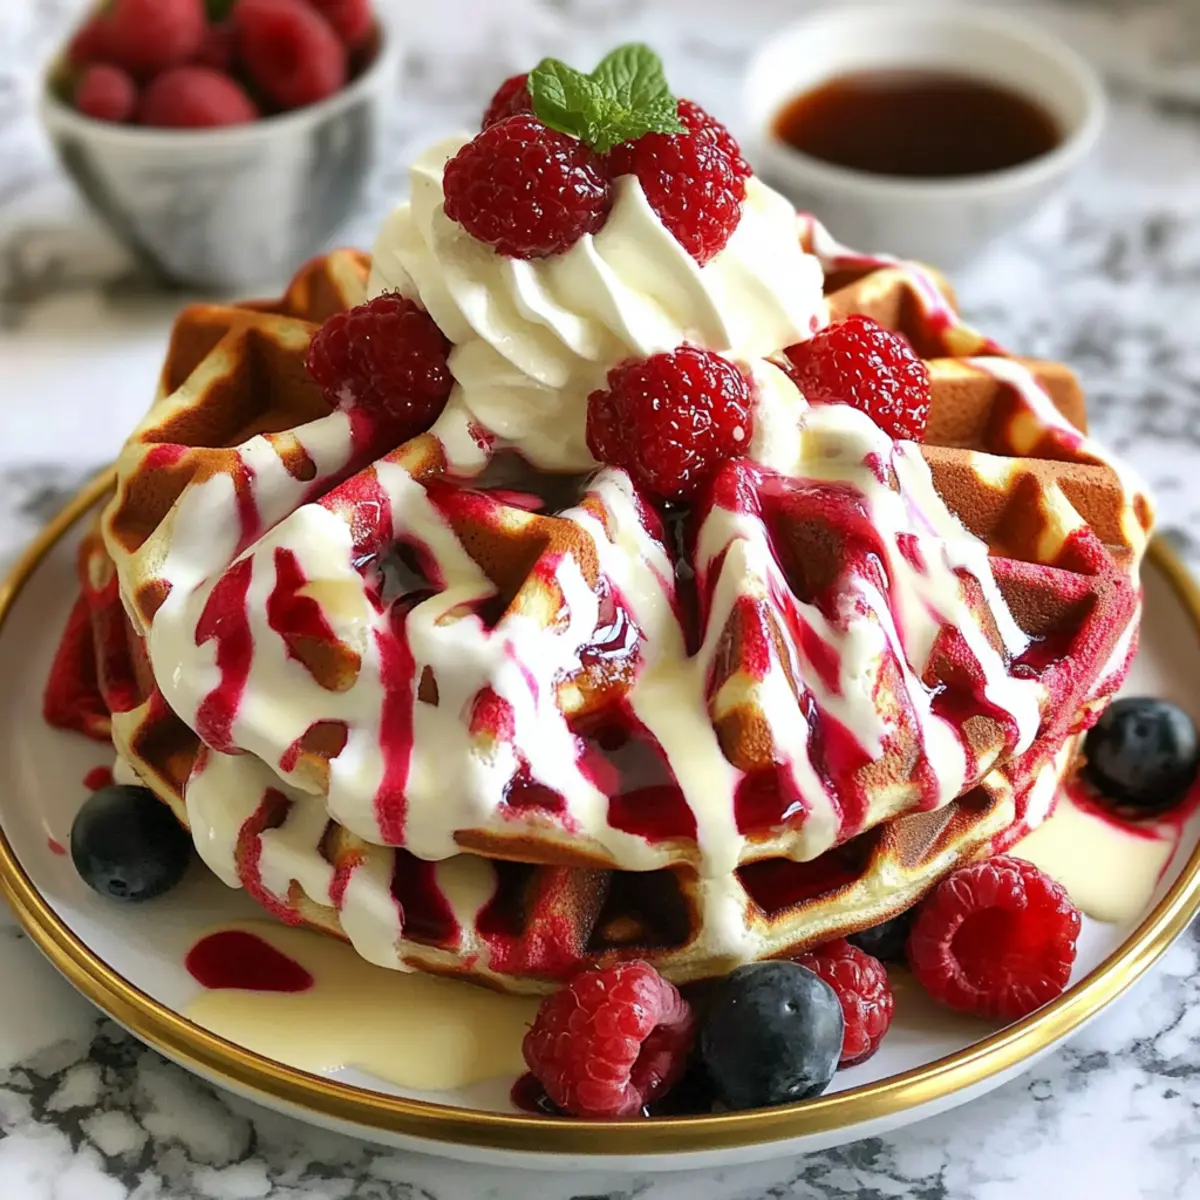
Add your favorite toppings like whipped cream or fresh berries for an extra touch of deliciousness!
Red Velvet Marble Waffles Ingredients
For the Classic Waffle Batter
- All-Purpose Flour – This provides the foundational structure for your waffles, but you can substitute it with a gluten-free flour blend.
- Sugar – Adds a touch of sweetness; consider using coconut sugar for a lower-glycemic option.
- Baking Powder – Ensures the waffles rise beautifully; make sure it’s fresh for the best fluffy results.
- Baking Soda – Aids in browning; do not substitute with baking powder for this recipe.
- Salt – Enhances the overall flavor; feel free to use sea salt or Himalayan salt as alternatives.
- Buttermilk – Adds moisture and a subtle tanginess; if unavailable, mix milk with 1 tbsp of vinegar as a substitute.
- Eggs – Essential for binding the ingredients together and adding richness; flaxseed eggs can be a great vegan alternative.
- Melted Butter – Imparts moisture; vegetable oil works well for a dairy-free version.
- Vanilla Extract – Elevates the flavor; pure vanilla is recommended for the best taste.
For the Red Velvet Batter
- Cocoa Powder – Infuses the red velvet batter with chocolate flavor; ensure it’s unsweetened for the best results.
- Red Food Coloring – Gives the signature red hue; consider substituting with beet juice for a natural alternative.
Get ready to impress with these stunning Red Velvet Marble Waffles!
Step‑by‑Step Instructions for Red Velvet Marble Waffles
Step 1: Prepare Classic Waffle Batter
In a large mixing bowl, whisk together 1½ cups of all-purpose flour, 1 tablespoon of sugar, 1 teaspoon of baking powder, ½ teaspoon of baking soda, and ¼ teaspoon of salt until well combined. In a separate bowl, beat together 1 cup of buttermilk, 2 large eggs, ¼ cup of melted butter, and 1 teaspoon of vanilla extract. Slowly fold the wet ingredients into the dry mixture, mixing gently until just combined to create the classic waffle batter.
Step 2: Prepare Red Velvet Batter
In another bowl, combine 1 cup of all-purpose flour, 2 tablespoons of unsweetened cocoa powder, ¼ cup of sugar, 1 teaspoon of baking powder, ½ teaspoon of baking soda, and ¼ teaspoon of salt. In a separate bowl, mix ¾ cup of buttermilk, 1 large egg, ¼ cup of melted butter, 1 teaspoon of vanilla extract, and 1 tablespoon of red food coloring. Combine the wet and dry ingredients carefully to achieve the rich red velvet batter without overmixing.
Step 3: Preheat Waffle Iron
Follow your waffle iron’s manufacturer instructions to preheat it properly, ensuring it reaches the ideal cooking temperature for fluffy Red Velvet Marble Waffles. Lightly grease the waffle iron with a non-stick spray or a small amount of butter to ensure easy release after cooking.
Step 4: Create Marbled Effect
With the waffle iron heated, spoon alternating dollops of the classic and red velvet batters onto the center of the prepped waffle iron. Use a toothpick or knife to gently swirl the batters together, creating a beautiful marbled effect without fully blending them. Aim for just a few swirls for an attractive presentation.
Step 5: Cook Waffles
Close the waffle iron and cook the waffles according to the manufacturer’s guidelines, typically for about 4-5 minutes, or until they turn golden brown and crisp. Carefully lift the lid and check for doneness; if the waffles spring back when pressed, they are ready to enjoy!
Step 6: Serve Warm
Once cooked, remove the waffles from the iron and serve them immediately while warm. Top your delicious Red Velvet Marble Waffles with your choice of whipped cream, fresh berries, or a drizzle of maple syrup for an extra touch of indulgence.
What to Serve with Red Velvet Marble Waffles
Indulging in these festive waffles opens a world of delicious pairings that will elevate your breakfast experience.
-
Whipped Cream: A fluffy cloud of creamy goodness that enhances the waffles’ rich flavors, making each bite feel indulgent and delightful.
-
Fresh Berries: Juicy strawberries, blueberries, or raspberries add a refreshing contrast to the sweet waffles, balancing the overall taste with a burst of flavor.
-
Maple Syrup: The classic sweet drizzle compliments the delicious red velvet without overwhelming; try warming it for an extra touch of coziness.
-
Chocolate Sauce: For those chocolate lovers, a drizzle of chocolate sauce adds decadence and extra sweetness, making breakfast feel like dessert.
-
Cream Cheese Frosting: Turn your waffles into a decadent treat by slathering on a dollop of rich cream cheese frosting, giving delightful tang and creaminess.
Serving these alongside your Red Velvet Marble Waffles creates a visually stunning and flavor-packed brunch that will leave everyone smiling!
Expert Tips for Red Velvet Marble Waffles
-
Don’t Overmix: Gently combine the batters to maintain fluffiness; overmixing can lead to dense, tough waffles.
-
Check Your Ingredients: Use fresh baking powder and baking soda to ensure the waffles rise properly and stay light and fluffy.
-
Temperature Matters: Preheat your waffle iron completely for even cooking; a hot iron creates the perfect golden-brown exterior.
-
Perfect Swirling: When creating the marbled effect, use just a few swirls of the batters; too much blending will lose the striking visual appeal of the Red Velvet Marble Waffles.
-
Customize Toppings: Get creative with your toppings! Whipped cream, berries, or even cream cheese frosting can elevate these waffles into a true breakfast masterpiece.
Make Ahead Options
These Red Velvet Marble Waffles are perfect for meal prep enthusiasts! You can prepare both waffle batters up to 24 hours in advance and store them separately in airtight containers in the refrigerator. This will keep the flavors fresh and maintain their fluffy texture. On the day you plan to serve, simply re-whisk each batter to ensure a smooth consistency, then create the marbled effect as instructed. For even better results, ensure your waffle iron is properly preheated before cooking—this ensures the waffles emerge light and crispy. By prepping ahead, you’ll save valuable time and serve a delightful breakfast with ease!
How to Store and Freeze Red Velvet Marble Waffles
Fridge: Store leftover waffles in an airtight container for up to 3 days. This keeps them fresh while making sure they’re ready when you crave another delightful bite!
Freezer: For longer storage, freeze waffles in a single layer on a baking sheet. Once frozen, pack them in a zip-top bag for up to 2 months.
Reheating: When you’re ready to enjoy, reheat in the toaster or oven for a few minutes until warmed through and crispy. Your Red Velvet Marble Waffles will taste as if they were freshly made!
Make-Ahead: Get a head start by preparing the batter a day in advance; just store it in the fridge, keeping the two batters separate for best results.
Red Velvet Marble Waffles Variations
Invite your creativity into the kitchen! You can easily customize these waffles to suit your mood and taste.
- Dairy-Free: Substitute buttermilk with almond milk plus 1 tablespoon of vinegar for a dairy-free option.
- Gluten-Free: Use a gluten-free flour blend in place of all-purpose flour, making these waffles accessible for everyone.
- Lower Sugar: Swap sugar for mashed ripe bananas or unsweetened applesauce to reduce sweetness while adding natural flavor.
- Extra Chocolatey: Fold in mini chocolate chips into either batter for an added burst of rich chocolate flavor.
- Nutty Addition: Add finely chopped nuts, like pecans or walnuts, to the red velvet batter for extra texture and crunch. The delightful mix will beautifully contrast the light, fluffy waffles.
- Seasoning Twist: Spice it up with a dash of cinnamon or nutmeg in the classic batter for a warm, aromatic twist.
- Fruit Infusion: Fold in fresh blueberries or raspberries for fruity bursts in every bite; they pair perfectly with the red velvet and create a wonderful taste experience!
- Holiday Spice: In the red velvet batter, add a touch of peppermint extract or ginger for a festive twist, perfect for holiday brunches.
Feel free to explore these variations and discover your perfect combination! Pair your creations with toppings like whipped cream or a drizzle of chocolate sauce for an extra decadent treat. Don’t forget to check out some other fun creations like our fluffy classic waffles or add a twist with a matcha version to keep brunch exciting!
Red Velvet Marble Waffles Recipe FAQs
How do I choose ripe ingredients for my Red Velvet Marble Waffles?
Absolutely! For the best results, use fresh ingredients. Look for eggs that are not past their expiration date and buttermilk that is not nearing spoilage. The buttermilk should have a slightly tangy aroma, but if it smells off, it’s best to discard it. When selecting flour, ensure it’s stored in a cool, dark place to maintain freshness.
What is the best method for storing leftover waffles?
Very simple! Store leftover Red Velvet Marble Waffles in an airtight container in the refrigerator for up to 3 days. This keeps them fresh and ready for quick breakfasts or snacks. For optimal crispness when reheating, simply pop them in a toaster or oven for a few minutes.
Can I freeze Red Velvet Marble Waffles? If so, how?
Absolutely! To freeze, first, allow the waffles to cool completely. Lay them in a single layer on a baking sheet and place them in the freezer until solid, usually about 1 to 2 hours. After freezing, transfer the waffles into a zip-top freezer bag, removing as much air as possible, and store them for up to 2 months. When you’re ready to enjoy, simply reheat in the toaster or oven until they are heated through and crispy.
What should I do if my waffle batter is too thick?
If your batter seems too thick, a simple fix is to add a tablespoon of milk or buttermilk to thin it out. Remember, the ideal batter for Red Velvet Marble Waffles should gently pour and spread but not be overly runny. If you prefer thicker waffles, maintain your original consistency but ensure it can still easily flow from your measuring cup.
Are there any dietary considerations with this recipe?
Definitely! For those with gluten sensitivities, you can use a gluten-free flour blend as a substitute for all-purpose flour. If you’re dealing with egg allergies, consider using flaxseed eggs—combine 1 tablespoon of ground flaxseed with 2.5 tablespoons of water for each egg needed and let it sit for about 5 minutes to thicken. This keeps your delicious waffles inclusive for everyone!
What can I serve with the waffles for added flavor?
Get creative! Topping your Red Velvet Marble Waffles with whipped cream, fresh berries, or even a drizzle of cream cheese frosting can elevate these delightful creations. If you’re in the mood for something decadently sweet, try adding chocolate sauce or a sprinkle of powdered sugar for a charming presentation—this way, you’ll bring joy to every breakfast table!
Red Velvet Marble Waffles: Fluffy Festive Delights Await
Ingredients
Equipment
Method
- In a large mixing bowl, whisk together all-purpose flour, sugar, baking powder, baking soda, and salt until combined. In another bowl, mix buttermilk, eggs, melted butter, and vanilla. Fold wet ingredients into dry to form the classic batter.
- In a separate bowl, combine all-purpose flour, cocoa powder, sugar, baking powder, baking soda, and salt. In another bowl, mix buttermilk, egg, melted butter, vanilla, and red food coloring. Combine wet and dry ingredients carefully for red velvet batter.
- Preheat the waffle iron according to the manufacturer's instructions and lightly grease it for easy release.
- Spoon alternating dollops of classic and red velvet batters onto the waffle iron. Use a toothpick to swirl the batters for a marbled effect.
- Cook the waffles according to the manufacturer's guidelines for about 4-5 minutes or until golden brown and crisp.
- Remove waffles from the iron and serve warm, topped with whipped cream, fresh berries, or syrup.
Leave a Reply