
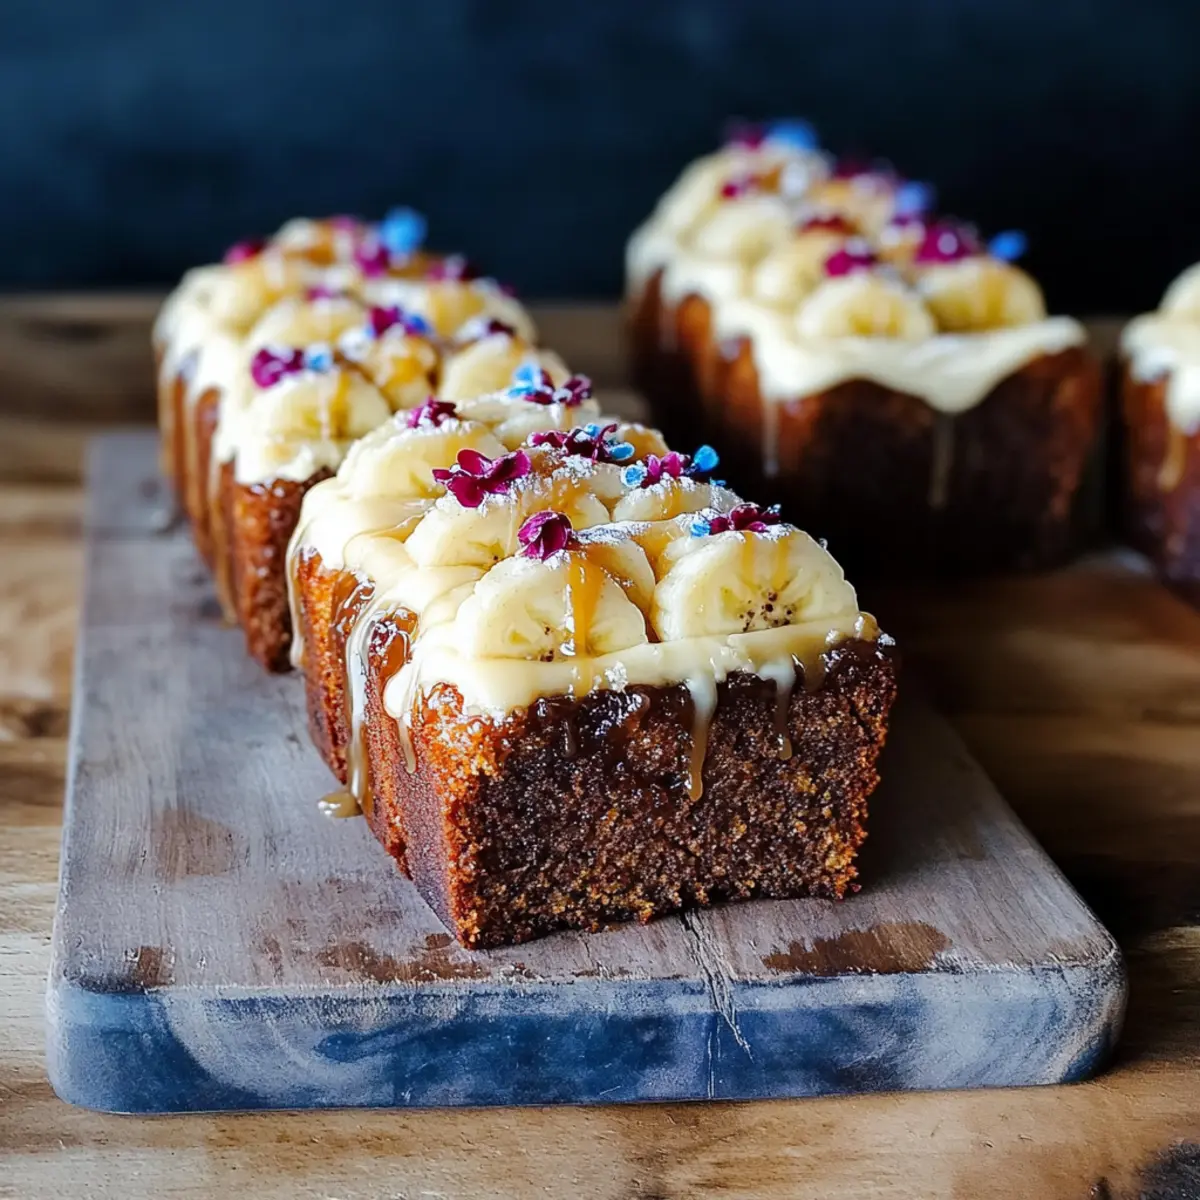
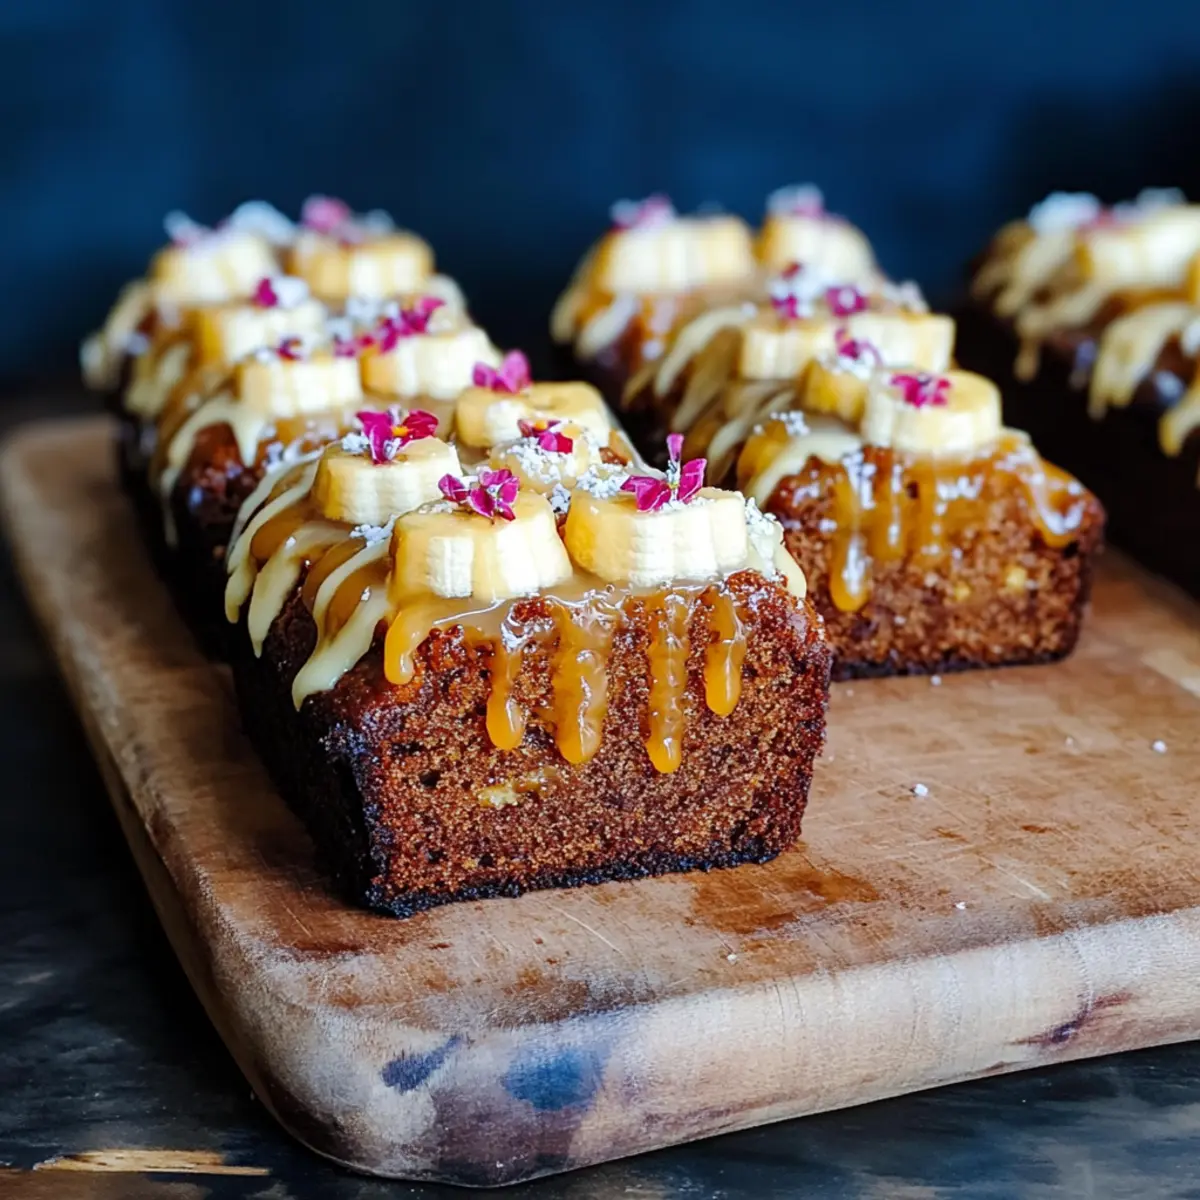
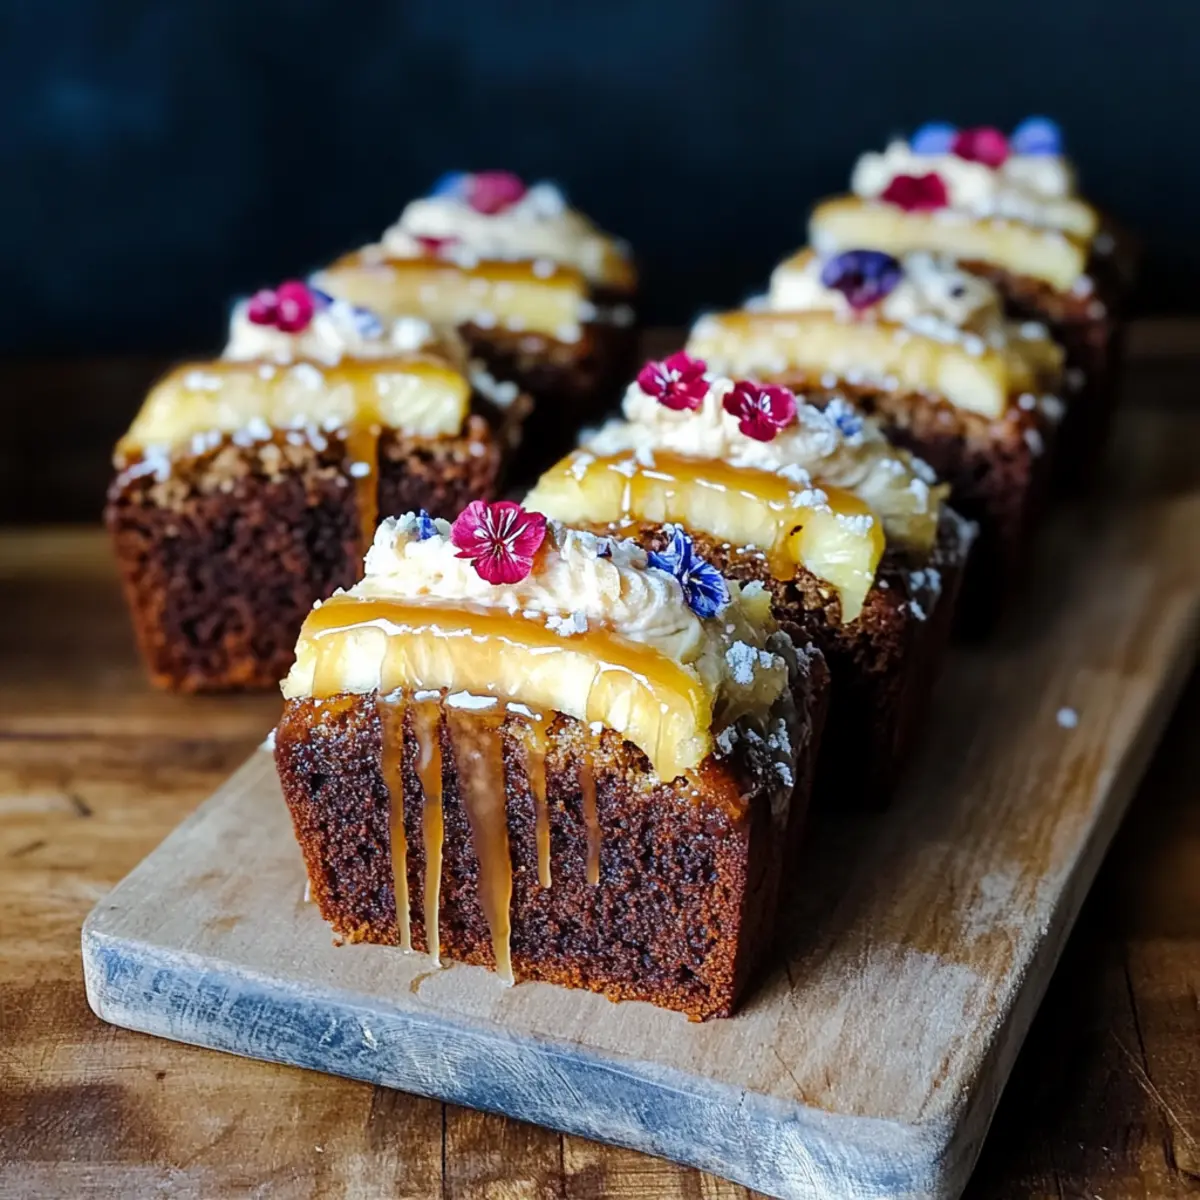
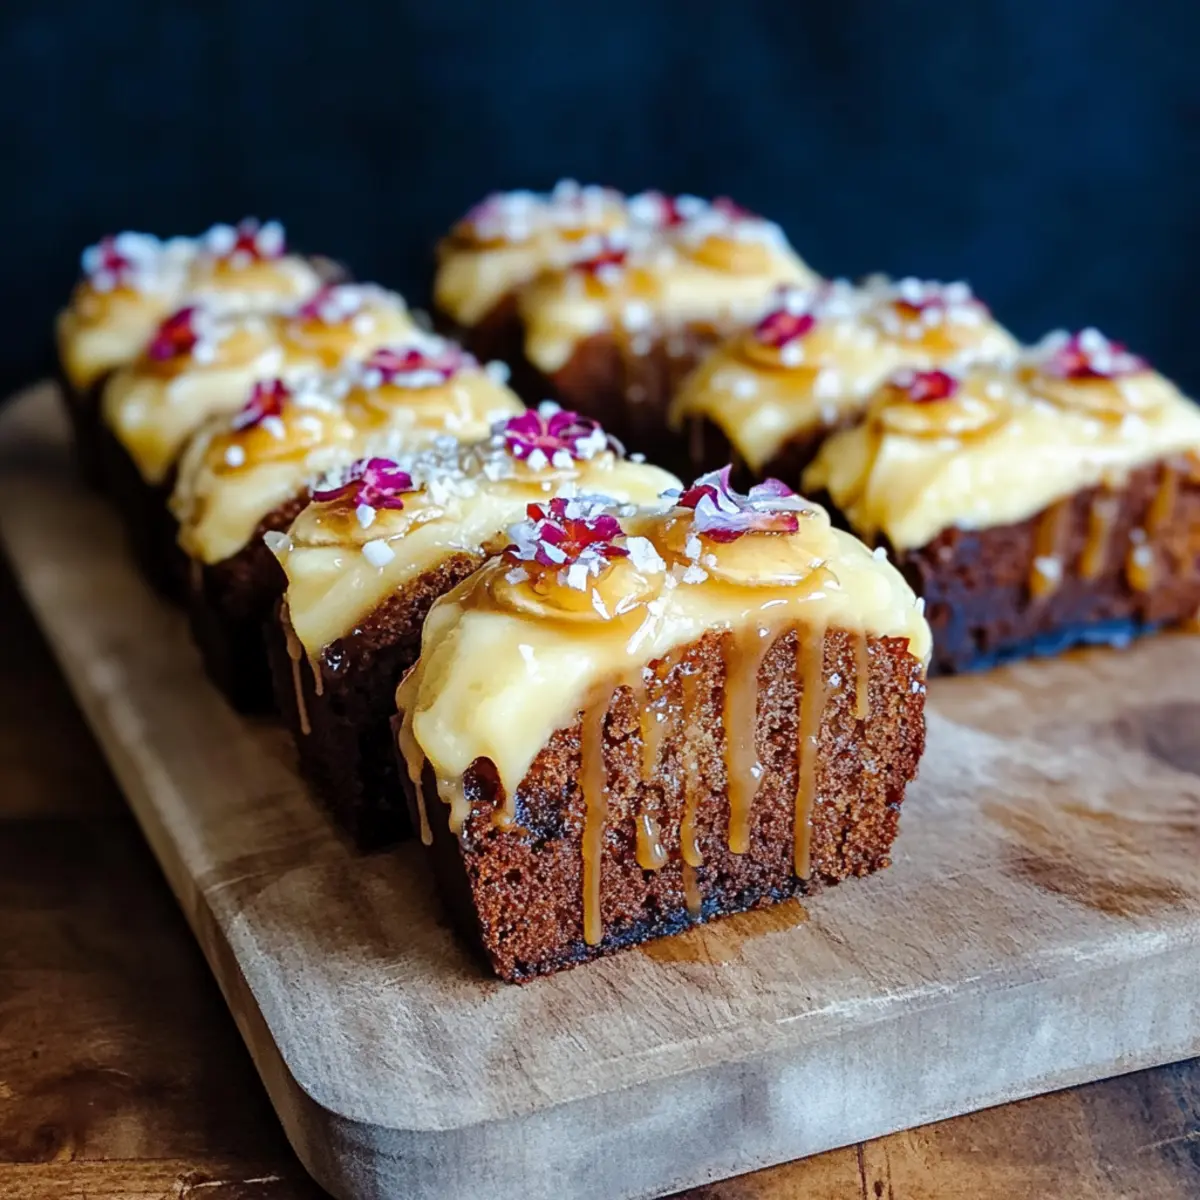
The tantalizing aroma of baked goods wafting through my kitchen always brings a cozy nostalgia, reminding me of family gatherings filled with laughter and sweet treats. This recipe for MINI HUMMINGBIRD LOAVES is a delightful twist on a classic Southern dessert, blending the tropical flavors of banana and pineapple into wonderfully moist, fluffy loaves. Not only are these mini delights easy to whip up, but they also make for a stunning dessert or afternoon snack that will impress friends and family. Topped with a creamy cream cheese icing and a drizzle of luscious salted caramel, these loaves are sure to become a comfort food favorite in your home. Are you ready to make something truly special? Let’s dive into this unforgettable baking adventure!
Why Are Mini Hummingbird Loaves So Irresistible?
Moist and Flavorful: Each mini loaf is packed with juicy banana and pineapple, creating an irresistible sweetness that melts in your mouth.
Easy to Make: With simple ingredients and straightforward steps, you’ll be enjoying warm loaves in no time, perfect for a beginner or seasoned chef.
Versatile Treat: Whether served as a cozy dessert or a delightful snack with tea, these loaves fit any occasion, much like our delicious Apple Cinnamon Mini bundt cakes.
Impressive Presentation: Drizzled with salted caramel and decorated with cream cheese icing, they don’t just taste good—they look fabulous!
Fun Customizations: Feel free to swap walnuts for pecans or include dried fruits to create your own special version of this Southern classic. These mini loaves are sure to please family and friends anytime!
Mini Hummingbird Loaf Ingredients
For the Batter
• Flour – Provides structure and body to the loaves; you can use whole wheat flour for a healthier option.
• Caster Sugar – Adds sweetness with a fine texture for even mixing; granulated sugar can be used, though the texture may differ slightly.
• Salt – Enhances flavor and is essential for balance; no substitution.
• Baking Powder – Acts as a leavening agent to help the loaves rise; ensure it is fresh for best results.
• Baking Soda – Also a leavening agent that works with acidic components like pineapple; no substitution.
• Ground Cinnamon & Allspice – Adds warmth and depth of flavor; substitute with nutmeg for a different spice profile.
• Rice Bran Oil – Keeps the loaves moist with a neutral flavor; vegetable oil or melted coconut oil can work as substitutes.
• Vanilla Extract – Provides aromatic sweetness; no substitution.
• Eggs – Binds ingredients and helps with leavening; ensure they’re at room temperature for better incorporation.
• Crushed Pineapple in Juice – Adds moisture and natural sweetness; use unsweetened for less sugar.
• Mashed Ripe Banana – Contributes flavor and moisture; approximately 2 bananas equal one cup.
• Toasted Walnuts – Adds crunch and a nutty flavor; traditionally pecans can be used instead, if preferred.
For Cream Cheese Icing
• Cream Cheese – Provides a rich, creamy base for icing; full-fat is best for consistency.
• Butter – Enhances creaminess and flavor; ensure it’s softened for easy mixing.
• Icing Sugar – Sweetens and thickens the icing for a smooth finish; no substitution.
For Salted Caramel Sauce
• Granulated Sugar – Forms the base of the caramel; be careful not to burn it.
• Water – Used to dissolve sugar before cooking; no substitution.
• Cream – Adds richness to the caramel; heavy cream is preferred. Evaporated milk can be a lighter option.
• Butter – Enriches the caramel; cubed butter is best for easy melting.
Indulge in these delightful mini Hummingbird loaves that are sure to fill your kitchen with love!
Step‑by‑Step Instructions for MINI HUMMINGBIRD LOAVES
Step 1: Preheat and Prepare
Begin by preheating your oven to 180°C (350°F). While it warms, grease your mini loaf tins with a touch of oil or non-stick spray to ensure easy removal later. This preparation sets the stage for your MINI HUMMINGBIRD LOAVES, helping them to bake evenly and slide out effortlessly after cooling.
Step 2: Mix Dry Ingredients
In a large mixing bowl or a cake mixer, combine the flour, caster sugar, salt, baking powder, baking soda, ground cinnamon, and allspice. Use a whisk to blend the dry ingredients thoroughly, ensuring an even mixture that will help the loaves rise beautifully. This step is essential for preventing clumps and creating that delightful fluffy texture in your loaves.
Step 3: Combine Wet Ingredients
Add the rice bran oil, vanilla extract, eggs, crushed pineapple, and mashed ripe banana into the dry mixture. Blend all the ingredients together until just combined, using a mixer or a spatula to avoid overmixing. The batter will be thick and fragrant, packing in all the flavors that make MINI HUMMINGBIRD LOAVES so irresistible.
Step 4: Fold in Nuts
Gently fold in the toasted walnuts into the batter with a spatula or wooden spoon. Be careful not to overmix; you want to distribute the nuts evenly without breaking them up too much. The walnuts add a delightful crunch and nutty flavor, perfectly complementing the moist banana and pineapple in your loaves.
Step 5: Fill the Tins
Pour the batter into the prepared mini loaf tins, filling each about three-quarters full for the best rise. Smooth the tops with a spatula for an even bake and a clean look. Place the tins in the preheated oven and bake for about 20-25 minutes, or until a skewer inserted into the center comes out clean, signaling deliciously baked MINI HUMMINGBIRD LOAVES.
Step 6: Cool the Loaves
Once baked, remove the mini loaves from the oven and let them sit in the tins for about 5 minutes. This short resting time allows them to set slightly, making them easier to extract. Then, gently transfer the loaves to a cooling rack to cool completely, where they will continue to develop their flavors and perfect texture.
Step 7: Make the Icing
In an electric mixer, beat together the softened cream cheese and butter until the mixture is smooth and creamy. Gradually add the icing sugar, continuing to mix until you achieve a light, fluffy texture that will be a delightful topping for your MINI HUMMINGBIRD LOAVES. This icing adds richness and depth to each bite.
Step 8: Prepare the Caramel Sauce
In a saucepan, combine granulated sugar and water over medium heat. Allow the mixture to cook without stirring until it turns a golden brown color, which should take about 7-10 minutes. Be vigilant as the sugar can quickly turn from perfect to burnt. Once ready, you’ll move on to add the cream and butter for a delicious salted caramel.
Step 9: Whisk in Cream and Butter
Gently heat the cream in a separate pot until warm. When your sugar reaches the desired golden color, slowly whisk in the warmed cream to avoid splatters, and then add the cubed butter. Stir until everything is well combined and smooth. Allow the caramel to cool slightly, making it easy to drizzle over your finished loaves.
Step 10: Assemble and Serve
Once the loaves are completely cool, pipe the cream cheese icing generously on top of each one. Drizzle with the homemade salted caramel sauce for that decadent touch. If desired, garnish with extra chopped walnuts or edible flowers for a beautiful presentation that elevates your MINI HUMMINGBIRD LOAVES into a stunning dessert.
What to Serve with Delightful Hummingbird Loaves
Enhance your baking experience with delightful pairings that turn your MINI HUMMINGBIRD LOAVES into a complete and satisfying meal.
-
Creamy Mashed Potatoes: The rich, buttery texture balances the sweetness of the loaves, making it a surprising yet delightful side.
-
Fresh Fruit Salad: A medley of vibrant, juicy fruits adds a refreshing contrast to the nuanced flavors of the loaves, brightening your palate.
-
Vanilla Ice Cream: The cool creaminess complements the warm spices of the loaves, creating a comforting dessert combination that feels indulgent.
-
Chai Tea: This spiced beverage harmonizes beautifully with the warming cinnamon and allspice flavors in the loaves, enhancing your sensory experience.
-
Pecans: Toasted pecans as a crunchy topping or served alongside provide an additional nutty flavor that enhances the loaves’ natural crunchiness.
-
Maple Syrup Drizzle: A gentle drizzle of maple syrup can enrich the sweetness of the loaves, melding with the salted caramel perfectly for extra indulgence.
Transform your MINI HUMMINGBIRD LOAVES into a feast that warms hearts while celebrating the joys of homemade baking!
How to Store and Freeze Mini Hummingbird Loaves
Room Temperature: Store your mini Hummingbird loaves in an airtight container at room temperature for up to 3 days to maintain their delightful moisture and flavor.
Fridge: If you’d like them to last longer, refrigerate them in an airtight container for up to a week. Just remember to bring them to room temperature for the best taste.
Freezer: For long-term storage, wrap the loaves tightly in plastic wrap and then in aluminum foil. They can be frozen for up to 3 months while retaining their delicious taste.
Reheating: To enjoy them warm, remove from the freezer and thaw overnight in the refrigerator, then warm in the oven at 180°C (350°F) for about 10 minutes. The mini Hummingbird loaves will be just as enticing!
Expert Tips for Mini Hummingbird Loaves
• Fresh Ingredients: Ensure your baking powder and baking soda are fresh for optimal rising. Expired leavening agents can lead to flat loaves.
• Moisture Check: Use ripe bananas and well-drained crushed pineapple to get that perfect moist texture in your mini Hummingbird loaves.
• Room Temperature Eggs: Make sure your eggs are at room temperature; this helps to create a smooth batter that incorporates air easily.
• Cool Completely: Allow the loaves to cool completely before icing. This prevents the cream cheese icing from melting and ensures a beautiful finish.
• Customize Nuts: Feel free to swap walnuts for pecans or even skip nuts altogether if allergies arise; your mini Hummingbird loaves will still shine!
Variations & Substitutions for Mini Hummingbird Loaves
Feel free to get creative with these delightful mini loaves, making them truly your own!
- Nut-Free: Replace walnuts with sunflower seeds or pumpkin seeds for a crunchy twist without any nuts.
- Spice Swap: Use ginger or cardamom instead of cinnamon for a fragrant alternative that adds warmth.
- Dried Fruit: Mix in dried cranberries or chopped apricots for unexpected bursts of sweetness and texture.
- Coconut Love: Add shredded coconut to the batter for an extra layer of tropical flavor. It pairs beautifully with the banana and pineapple!
- Gluten-Free: Use a gluten-free baking blend instead of traditional flour to make these lovely loaves celiac-friendly.
- Vegan Delight: Substitute eggs with flaxseed meal mixed with water and use a plant-based cream cheese for icing.
- Zesty Citrus: Incorporate some lime or orange zest into the batter for a bright flavor boost that’s refreshing.
- Chocolate Drizzle: For a decadent twist, drizzle melted dark chocolate over the icing for an indulgent finish.
Explore beyond the traditional with these ideas, and don’t forget to check out more tempting recipes like our Mini Beef Wellington or our equally luscious Apple Cinnamon Mini bundt cakes for inspiration!
Make Ahead Options
These delightful Mini Hummingbird Loaves are a fantastic option for meal prep, allowing you to enjoy homemade treats with minimal effort on busy days. You can prepare the batter up to 24 hours in advance; simply mix the dry ingredients, and then combine the wet ingredients right before baking to maintain the freshest flavor. Alternatively, bake the loaves ahead and refrigerate them for up to 3 days in an airtight container to keep them moist. When you’re ready to serve, simply let them come to room temperature or warm them in the oven for a few minutes, then finish with the cream cheese icing and salted caramel for that fresh-baked taste you love!
Mini Hummingbird Loaves Recipe FAQs
How do I select the right bananas for mini Hummingbird loaves?
Absolutely! For the best mini Hummingbird loaves, choose bananas that are overripe, with dark spots, as they are sweeter and more flavorful. If you need to speed up the ripening process, you can place them in a paper bag for a day or two—this traps the ethylene gas, which helps them ripen faster.
What’s the best way to store mini Hummingbird loaves?
For optimal freshness, store your mini Hummingbird loaves in an airtight container at room temperature for up to 3 days. If you plan to enjoy them later, refrigerate them in an airtight container for up to a week. Just remember to let them come to room temperature before serving for the best taste.
Can mini Hummingbird loaves be frozen?
Very! To freeze your mini Hummingbird loaves, wrap each one tightly in plastic wrap to prevent freezer burn, then place them in a freezer-safe bag or container. They can be stored in the freezer for up to 3 months. When you’re ready to enjoy, thaw them overnight in the refrigerator and warm briefly in the oven at 180°C (350°F) for about 10 minutes to bring back their delightful texture.
What can I do if my mini Hummingbird loaves don’t rise properly?
The most common reasons for low-rising mini Hummingbird loaves are expired baking powder or baking soda. Always check that these ingredients are fresh before using. It’s also essential to combine your wet and dry ingredients gently and avoid overmixing, which can lead to a dense texture.
Are mini Hummingbird loaves suitable for people with nut allergies?
Absolutely! If you or a loved one has nut allergies, simply omit the nuts altogether. The loaves will still be delicious and moist. You can also consider substituting with seeds, such as sunflower seeds or pumpkin seeds, for added texture without the nut allergy risk.
How long do mini Hummingbird loaves stay fresh in the fridge?
They can last up to a week in the fridge when stored properly in an airtight container. Just make sure to bring them back to room temperature for the softest experience. Enjoy your baking adventure!
Irresistible Mini Hummingbird Loaves Bursting with Flavor
Ingredients
Equipment
Method
- Preheat your oven to 180°C (350°F) and grease mini loaf tins.
- In a large bowl, mix flour, caster sugar, salt, baking powder, baking soda, ground cinnamon, and allspice.
- Add rice bran oil, vanilla extract, eggs, crushed pineapple, and mashed banana; mix until just combined.
- Fold in toasted walnuts gently.
- Pour batter into prepared tins, filling them three-quarters full, and bake for 20-25 minutes.
- Remove from oven, let sit in tins for 5 minutes, then transfer to a cooling rack.
- Beat together cream cheese and softened butter, then add icing sugar until light and fluffy.
- In a saucepan, combine sugar and water over medium heat until golden brown.
- Whisk in warmed cream and cubed butter until smooth; allow to cool slightly.
- Pipe cream cheese icing on cooled loaves and drizzle with salted caramel sauce.
- Garnish with extra chopped walnuts or edible flowers if desired.
Leave a Reply